Personalized Introduction
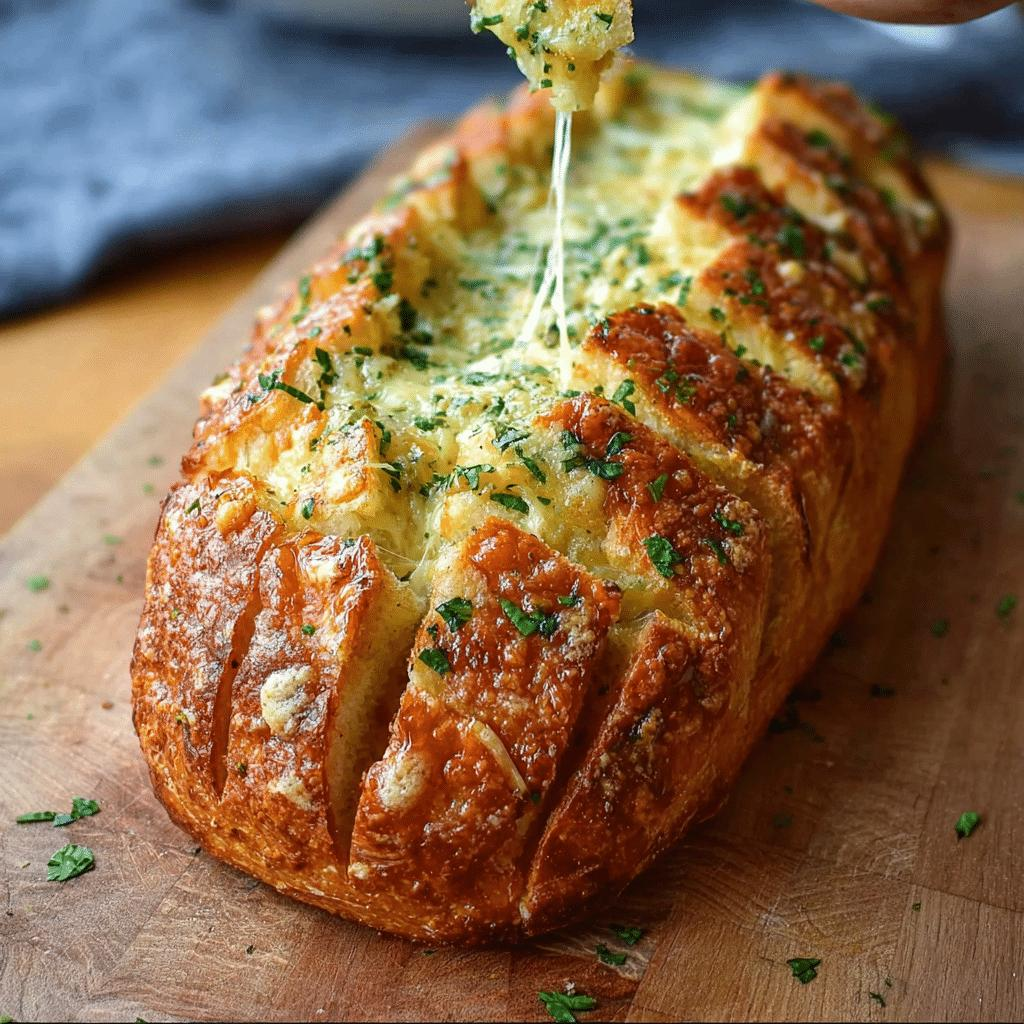
Hello, friend! If there’s one thing that can instantly make a kitchen feel warm and inviting, it’s the smell of freshly baked bread. And when that bread is filled with garlic, herbs, and melted cheese, it becomes almost impossible to resist.
I absolutely love making this Swirled Garlic Herb and Cheese Bread because it looks impressive but is surprisingly simple to prepare. The beautiful swirls of cheese and herbs running through every slice make it feel special enough for guests, yet easy enough for a cozy family dinner.
Whether you serve it alongside soup, pasta, or enjoy it on its own fresh from the oven, this bread delivers incredible flavor in every bite.
Recipe Origin & Story
Swirled breads have been enjoyed in many cultures for generations. Bakers discovered that rolling fillings into dough created beautiful layers of flavor and texture throughout the loaf.
This garlic herb and cheese version takes inspiration from classic garlic bread and artisan cheese loaves. By combining the two, you get a bread that’s soft and fluffy on the inside, golden on the outside, and packed with savory flavor from edge to edge.
For me, this bread became a favorite during family gatherings because everyone would pull off warm slices before dinner even started.
Ingredient Spotlight
- Main Star: Mozzarella cheese creates those irresistible melty layers and beautiful cheese pulls inside the bread.
- Secret Boost: Fresh garlic mixed with butter and herbs infuses every swirl with rich, aromatic flavor.
- Quality Tips: Use fresh herbs whenever possible, freshly grated cheese for better melting, and high-quality butter for richer flavor.
Nutritional Benefits
This homemade bread provides energy from the dough while cheese contributes protein and calcium. Garlic contains naturally occurring compounds that have long been valued in cooking for both flavor and nutritional benefits.
Fresh herbs like parsley and oregano add flavor without extra calories while contributing small amounts of vitamins and antioxidants.
Homemade bread also allows you to control ingredients and reduce preservatives commonly found in store-bought options.
Adaptable Variations
- Dietary Swaps: Use gluten-free bread flour blends if needed or dairy-free cheese alternatives for a dairy-free version.
- Flavor Twists: Add sun-dried tomatoes, chopped olives, red pepper flakes, or parmesan cheese for extra depth.
- Seasonal Spins: Use fresh basil in summer and rosemary or thyme during cooler months for seasonal flavor changes.
Cooking Science Explained
Why does kneading matter? Kneading develops gluten, which gives bread its structure and chewy texture.
Why does the dough need to rise? Yeast produces gas bubbles that make the bread light and fluffy instead of dense and heavy.
Why brush with butter after baking? Warm butter keeps the crust soft while adding extra flavor and shine.
Easy, Step-by-Step Recipe
Ingredients
- 3 cups all-purpose flour
- 2 1/4 teaspoons active dry yeast
- 1 tablespoon sugar
- 1 teaspoon salt
- 1 cup warm water
- 2 tablespoons olive oil
- 4 tablespoons butter, softened
- 4 garlic cloves, minced
- 1 tablespoon chopped fresh parsley
- 1 teaspoon dried oregano
- 1 1/2 cups shredded mozzarella cheese
- 1/4 cup grated parmesan cheese
- 1 tablespoon melted butter for brushing
Instructions
- Combine warm water, sugar, and yeast in a bowl. Let sit for 5–10 minutes until foamy.
- Add flour, salt, and olive oil. Mix until a dough forms.
- Knead for 8–10 minutes until smooth and elastic.
- Place dough in a lightly oiled bowl, cover, and let rise for 1 hour or until doubled in size.
- Mix softened butter, garlic, parsley, and oregano in a small bowl.
- Roll dough into a large rectangle on a lightly floured surface.
- Spread garlic herb butter evenly over the dough.
- Sprinkle mozzarella and parmesan cheese across the surface.
- Roll the dough tightly into a log.
- Slice the log lengthwise and twist the two halves together with the filling exposed.
- Transfer to a greased loaf pan.
- Cover and allow to rise for another 30 minutes.
- Preheat oven to 190°C (375°F).
- Bake for 30–35 minutes until golden brown.
- Brush with melted butter immediately after baking.
- Cool slightly before slicing and serving.
Practical & Valuable Tips
- Storage: Keep in an airtight container for up to 3 days at room temperature.
- Serving Ideas: Serve with pasta, soup, salad, or as an appetizer with marinara sauce.
- Substitutions: Try cheddar, provolone, or Monterey Jack cheese for different flavor profiles.
Make-Ahead & Batch-Cooking
You can prepare the dough the night before and allow it to rise slowly in the refrigerator. This actually develops even more flavor.
The baked loaf also freezes well. Slice it before freezing so you can easily reheat individual portions whenever you need them.
Eco-Friendly Kitchen Hacks
- Use leftover herbs from other recipes to reduce waste.
- Freeze extra cheese before it spoils.
- Bake multiple loaves at once to save energy.
- Store leftovers in reusable containers instead of disposable bags.
Pairing Suggestions
- Beverages: Sparkling water, iced tea, lemonade, or a light fruit drink.
- Sides & Sauces: Tomato soup, marinara sauce, Caesar salad, pasta dishes, or roasted vegetables.
Frequently Asked Questions
- Can I use store-bought dough?
Yes, store-bought pizza or bread dough works well if you’re short on time. - Can I freeze the bread?
Absolutely. Freeze slices in an airtight container for up to 2 months. - Why didn’t my dough rise?
Your yeast may be expired or the water may have been too hot or too cold. - Can I add other fillings?
Yes, ingredients like spinach, cooked bacon, or olives work wonderfully.
Call to Action
I hope you give this Swirled Garlic Herb and Cheese Bread a try. It’s soft, cheesy, flavorful, and guaranteed to make your kitchen smell amazing.
If you bake it, save the recipe and share it with friends and family. Homemade bread has a way of bringing people together around the table.
Bonus: 5 Expert Tips for Perfect Baking
- Use freshly grated cheese for smoother melting and better flavor.
- Allow the dough enough time to rise for a lighter texture.
- Don’t add too much flour during kneading or the bread may become dense.
- Let the loaf cool slightly before slicing to help the cheese set properly.
- Brush with melted butter immediately after baking for a soft, flavorful crust.
Follow these simple tips and you’ll enjoy a bakery-quality garlic herb and cheese bread every single time.
“`