Personalized Introduction
Have you ever walked past a bakery and wished you could bottle up that incredible aroma of freshly baked bread? That’s exactly how I feel every time I make Japanese Melonpan at home. The smell of buttery cookie dough baking over soft, fluffy bread fills every corner of my kitchen, and honestly, it’s impossible to wait for them to cool before taking that first bite.
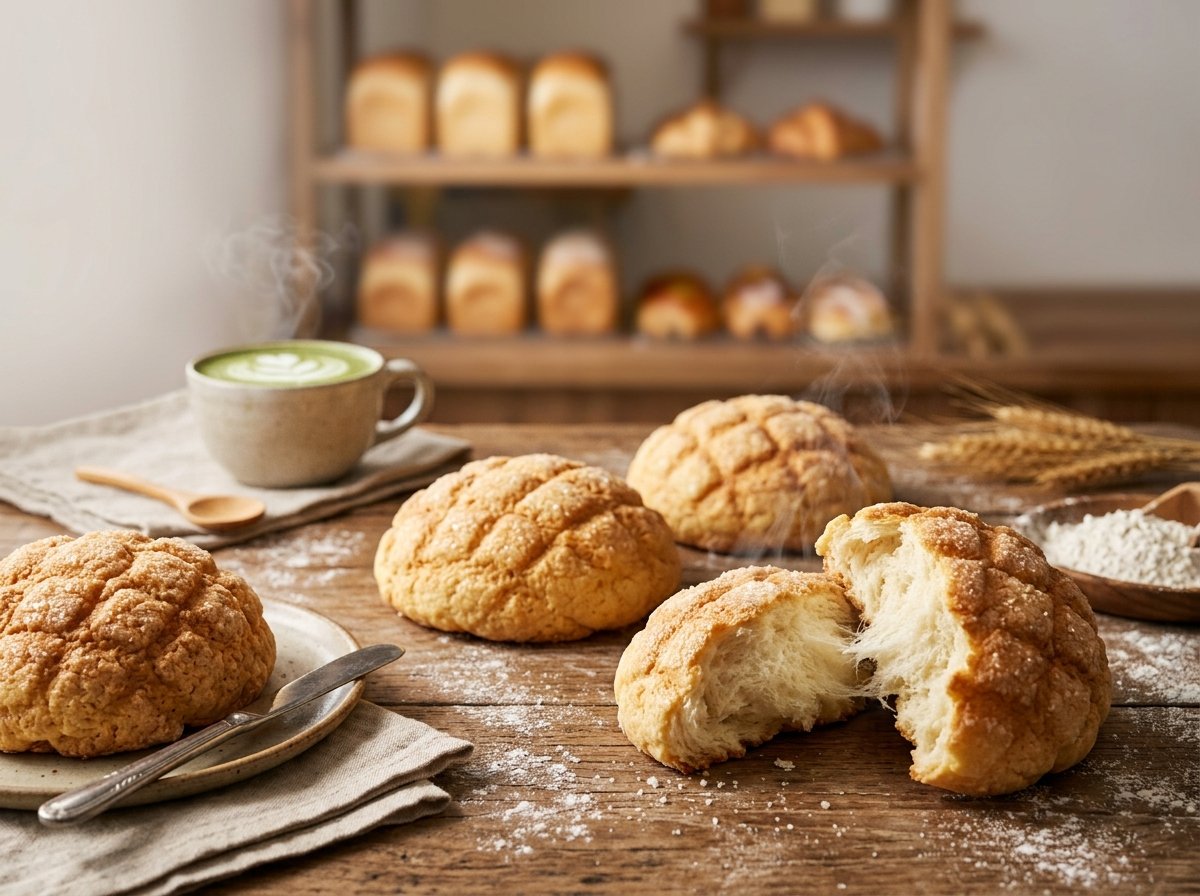
The first time I tried melonpan, I was surprised by its name. I expected it to taste like melon, but instead, I discovered a wonderfully soft bread wrapped in a crisp, buttery cookie crust. The signature crisscross pattern resembles the skin of a cantaloupe, which is where the name comes from. Since then, it’s become one of my favorite Japanese bakery treats to bake on slow weekends.
If you’ve never made homemade bread before, don’t let this recipe intimidate you. I’ll guide you through every step, explain why each stage matters, and share the little tricks that help create bakery-quality melonpan right in your own kitchen.
Recipe Origin & Story
Melonpan is one of Japan’s most beloved sweet breads and can be found in bakeries, convenience stores, and cafés throughout the country. Despite its name, traditional melonpan usually doesn’t contain melon flavor. Instead, its name comes from the beautiful cookie topping that resembles the textured surface of a melon.
The bread itself was inspired by European baking techniques introduced to Japan many years ago. Japanese bakers combined soft milk bread with a crisp cookie dough topping, creating a unique pastry that’s now considered a bakery classic.
I first discovered melonpan while exploring Japanese baking recipes. I couldn’t believe how something so elegant could be made in a home kitchen. After a few batches and plenty of practice shaping the cookie topping, it quickly became one of those recipes I love sharing with family and friends. Watching someone bite through the crispy crust into the fluffy bread underneath never gets old.
Ingredient Spotlight
- Main Star: Bread flour is the foundation of authentic melonpan. Its higher protein content develops more gluten, giving the bread its wonderfully soft and slightly chewy texture.
- Secret Boost: A small amount of vanilla extract in the cookie dough adds warmth and sweetness, while a light coating of granulated sugar before baking creates the signature crisp, sparkling crust.
- Quality Tips: Use fresh instant yeast for the best rise, room-temperature butter for easy mixing, and high-quality unsalted butter for the richest flavor. Fresh bread flour also helps create a lighter, fluffier loaf.
Nutritional Benefits
Melonpan is definitely a special treat, but it also provides a few nutritional benefits when enjoyed in moderation.
Milk contributes calcium and protein, supporting healthy bones and helping create the bread’s tender texture.
Eggs provide protein and essential vitamins while adding richness to both the bread and cookie topping.
Butter supplies healthy fats that create the soft crumb and delicious buttery flavor that makes melonpan so memorable.
Adaptable Variations
- Dietary Swaps: Dairy-free butter and plant-based milk can be substituted for a dairy-free version. While gluten-free bread flour blends exist, the texture will differ slightly from traditional melonpan.
- Flavor Twists: Add matcha powder to the cookie dough, mix chocolate chips into the bread, fill the center with custard or sweet red bean paste, or sprinkle cinnamon sugar over the top before baking.
- Seasonal Spins: In spring, add lemon zest to the cookie dough. Summer pairs beautifully with citrus flavors, autumn welcomes pumpkin spice or cinnamon, while winter versions are delicious with cocoa or espresso powder.
Cooking Science Explained
Making melonpan becomes much easier once you understand a few simple baking principles.
First, kneading develops gluten, which gives the bread its soft, stretchy structure. Proper kneading creates the light, airy interior that Japanese milk breads are famous for.
Second, chilling the cookie dough before shaping helps it stay firm enough to wrap neatly around each bread roll without becoming sticky.
Finally, rolling the cookie topping in sugar before baking creates the classic crispy shell as the sugar caramelizes in the oven.
Easy, Step-by-Step Recipe
Ingredients
Bread Dough
- 3 cups (375g) bread flour
- 2¼ teaspoons instant yeast
- ¼ cup (50g) granulated sugar
- 1 teaspoon salt
- ¾ cup (180ml) warm milk
- 1 large egg
- 3 tablespoons unsalted butter, softened
Cookie Topping
- ½ cup (115g) unsalted butter, softened
- ½ cup (100g) granulated sugar
- 1 large egg
- 1 teaspoon vanilla extract
- 1¾ cups (220g) all-purpose flour
- 1 teaspoon baking powder
For Finishing
- ¼ cup granulated sugar for coating
Instructions
- In a large bowl, combine bread flour, sugar, salt, and instant yeast.
- Add the warm milk and egg. Mix until a rough dough forms.
- Add the softened butter and knead for 10–12 minutes until the dough becomes smooth, elastic, and slightly tacky.
- Place the dough in a lightly greased bowl, cover, and let rise for about 1 hour or until doubled in size.
- Meanwhile, prepare the cookie topping by creaming together butter and sugar until light and fluffy.
- Beat in the egg and vanilla extract, then gradually mix in the flour and baking powder until a soft cookie dough forms.
- Divide the cookie dough into 8 equal portions, flatten each into a disk, and refrigerate for 20–30 minutes.
- Punch down the risen bread dough and divide it into 8 equal pieces. Shape each into a smooth ball.
- Wrap each bread dough ball with one chilled cookie dough disk, covering the top and sides evenly.
- Roll the tops gently in granulated sugar.
- Using a knife or dough scraper, carefully score a crisscross pattern into the cookie layer without cutting into the bread dough.
- Place the shaped melonpan on a parchment-lined baking tray, cover lightly, and let rise for another 30–40 minutes.
- Preheat the oven to 350°F (175°C).
- Bake for 15–18 minutes until the tops are lightly golden and crisp.
- Cool on a wire rack for at least 10 minutes before serving.
Practical & Valuable Tips
- Storage: Store cooled melonpan in an airtight container at room temperature for up to 2 days or refrigerate for up to 4 days.
- Serving Ideas: Serve warm with coffee, milk, hot chocolate, or green tea. They’re also delicious with fresh fruit and whipped cream.
- Substitutions: Bread flour produces the best texture, but all-purpose flour can be used if necessary. Vanilla may be replaced with almond extract for a different flavor profile.
Make-Ahead & Batch-Cooking
The cookie dough can be prepared up to two days in advance and refrigerated until needed. The bread dough may also be refrigerated overnight after the first rise for even deeper flavor.
Melonpan freezes surprisingly well. Once completely cooled, wrap each bun individually and freeze for up to two months. Reheat in a 300°F (150°C) oven for about 8 minutes to restore the crispy topping.
Eco-Friendly Kitchen Hacks
- Measure ingredients accurately to reduce unnecessary food waste.
- Freeze extra melonpan instead of letting it become stale.
- Bake a full tray at once to maximize oven efficiency.
- Reuse parchment paper if it’s still clean after baking.
Pairing Suggestions
- Beverages: Matcha latte, hot coffee, milk tea, iced latte, Japanese green tea, or hot chocolate all pair wonderfully with melonpan.
- Sides & Extras: Fresh berries, fruit salad, vanilla ice cream, whipped cream, sweet red bean paste, or homemade custard create an even more indulgent dessert.
Frequently Asked Questions
- Does melonpan actually taste like melon?
Traditional melonpan usually doesn’t contain melon flavor. Its name comes from the melon-like pattern on the cookie topping. - Why is my cookie topping cracking?
Small cracks are completely normal and actually give melonpan its signature rustic appearance. - Can I fill the bread with custard?
Absolutely! Custard, chocolate cream, sweet red bean paste, and pastry cream are all popular fillings. - Can I freeze homemade melonpan?
Yes. Once cooled completely, freeze individually wrapped buns for up to two months and reheat in the oven before serving.
Call to Action
I hope this homemade Japanese Melonpan recipe inspires you to bring a little Japanese bakery magic into your own kitchen. There’s something incredibly rewarding about pulling these beautiful golden buns from the oven and hearing that delicate crisp crust crackle as you take your first bite.
If you try this recipe, I’d love to hear how it turned out! Leave a comment below, share your favorite flavor variation, or post a photo of your freshly baked melonpan on social media. Your baking adventures inspire other home bakers to try something new!
Bonus: Your Kitchen Notes
This section is your personal baking journal. Did you add matcha, chocolate chips, or a custard filling? Maybe you experimented with different scoring patterns or flavored sugars. Write down your favorite adjustments, baking times, and family-approved ideas so every batch becomes even better than the last.
Happy baking, and enjoy every crispy, buttery, fluffy bite of your homemade Japanese Melonpan!