Personalized Introduction
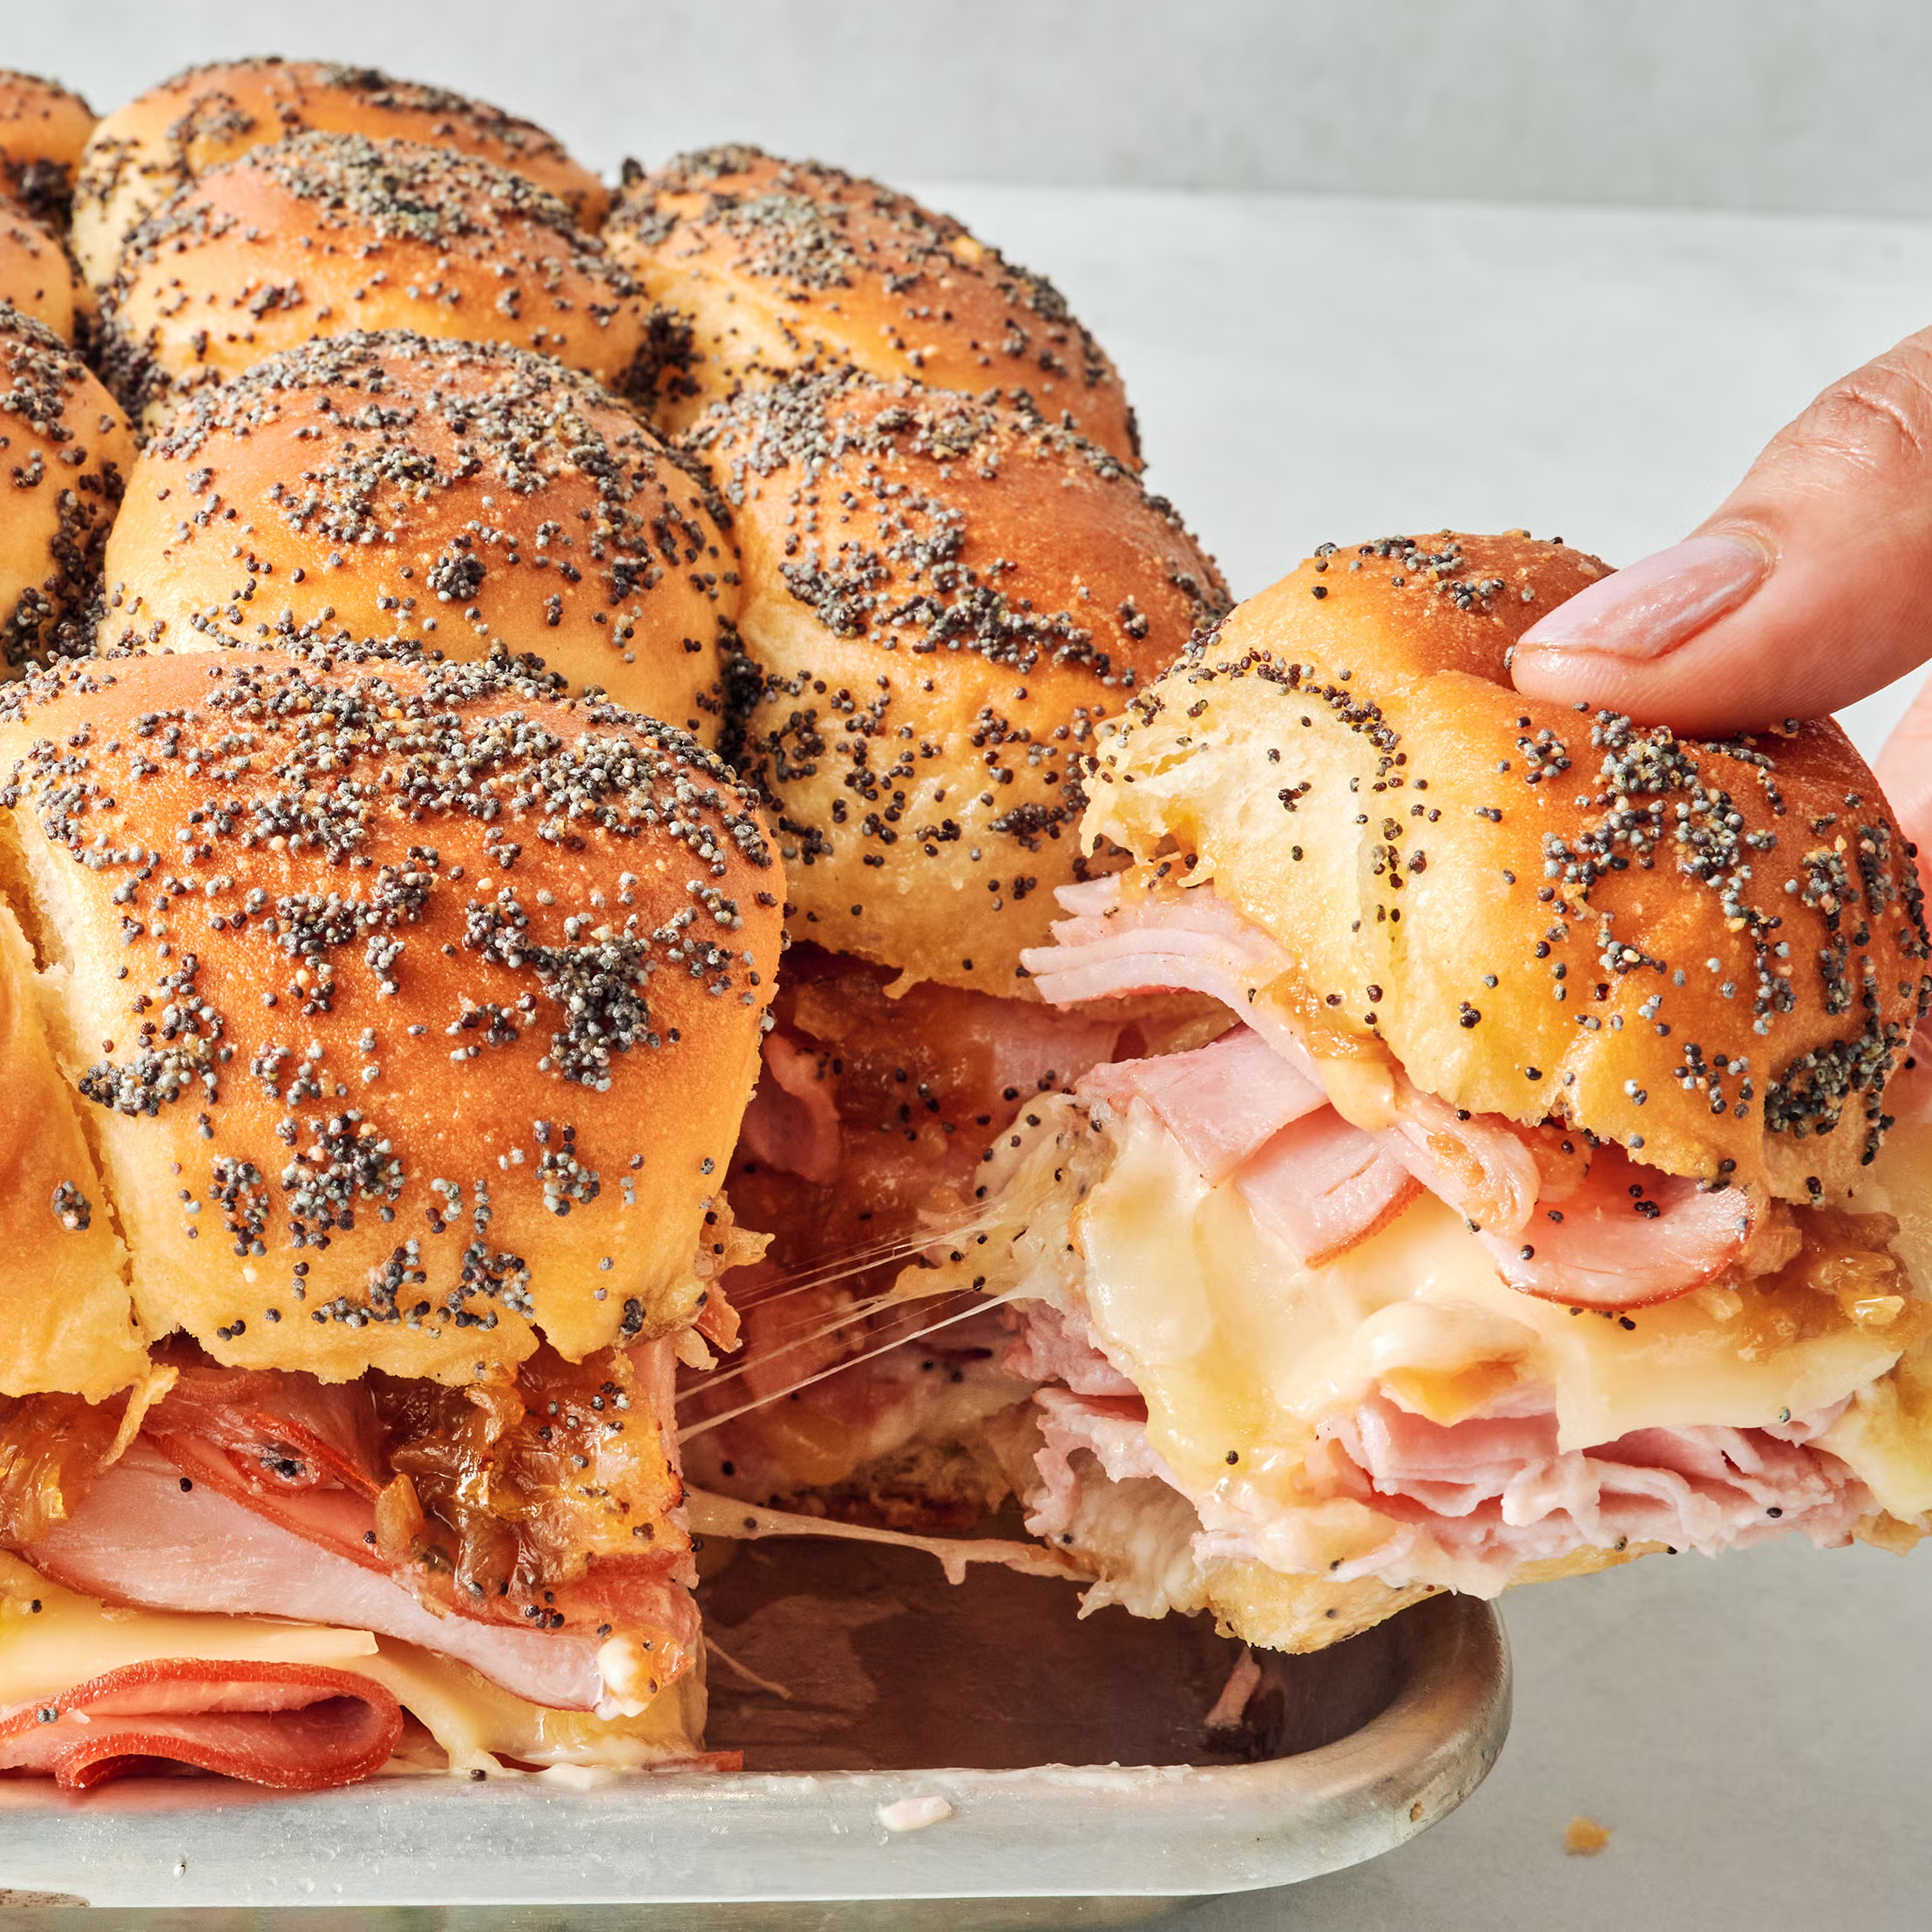
Whenever I’m hosting a gathering, whether it’s a birthday party, game night, holiday celebration, or a casual weekend get-together, there’s one recipe I know I can always count on: Party Sliders. They’re warm, cheesy, buttery, and incredibly easy to make, yet they disappear from the serving tray faster than almost any other appetizer I prepare.
I still remember the first time I made these sliders. I wanted something that looked impressive but wouldn’t keep me stuck in the kitchen while everyone else was having fun. After experimenting with soft Hawaiian rolls, seasoned beef, melted cheese, and a flavorful garlic butter topping, I discovered the perfect party food. Everyone kept asking for “just one more,” and before I knew it, every single slider had vanished.
That’s exactly why I love sharing this recipe. It’s beginner-friendly, budget-conscious, and flexible enough to suit almost any occasion. Whether you’re feeding six people or thirty, these sliders come together quickly and always earn compliments. If you’re looking for an appetizer that feels homemade without requiring hours of preparation, you’re in exactly the right place.
Today, I’m sharing not only the recipe itself but also all my favorite tips, variations, storage ideas, and little tricks that make these Party Sliders consistently delicious every single time.
Recipe Origin & Story
Mini sandwiches have been popular for generations because they’re easy to serve, easy to eat, and perfect for entertaining. Modern party sliders became especially popular in North America, where home cooks began using packs of connected dinner rolls to create large batches of baked sandwiches in one pan.
Unlike traditional burgers that require individually cooking patties and assembling each sandwich separately, baked sliders allow you to prepare an entire tray at once. They’re ideal for family gatherings because everyone can simply grab one—or two or three—and keep mingling without needing utensils.
In my own kitchen, Party Sliders have become a tradition. They’re the first thing friends request when we plan movie nights, football parties, or holiday dinners. I even make them for casual Sunday lunches because they’re so simple. Every time I pull that golden, buttery tray from the oven, the smell alone brings everyone into the kitchen before I even call them to eat.
What I appreciate most is how adaptable this recipe is. You can customize the filling to match your guests’ tastes, making it one of those dependable recipes you’ll use again and again.
Ingredient Spotlight
- Main Star: Soft Hawaiian rolls are the true hero of this recipe. Their slightly sweet flavor perfectly balances savory meat, melted cheese, and buttery toppings while staying wonderfully soft after baking.
- Secret Boost: A buttery glaze made with melted butter, Dijon mustard, Worcestershire sauce, garlic powder, onion powder, and poppy seeds gives these sliders their irresistible golden crust and rich flavor.
- Quality Tips: Choose fresh rolls that feel soft and pillowy. Use freshly sliced cheese whenever possible because it melts more evenly than pre-shredded cheese. If using ground beef, select an 80/20 or 85/15 blend for juicy, flavorful results.
Nutritional Benefits
Although Party Sliders are definitely comfort food, they can still fit into a balanced meal when served alongside fresh vegetables or salad.
Ground beef provides protein, iron, vitamin B12, and zinc, all of which help support muscle function and energy production. Cheese contributes calcium and protein, helping create a satisfying appetizer that keeps guests feeling full longer.
If you add onions, peppers, spinach, mushrooms, or tomatoes to the filling, you’ll also increase the amount of vitamins, minerals, and dietary fiber in every bite.
Serving sliders with vegetable trays, fruit platters, or crisp salads creates a balanced party spread that offers something for everyone.
Adaptable Variations
- Dietary Swaps: Substitute ground turkey or chicken for beef to create a lighter version. Use gluten-free dinner rolls for guests with gluten sensitivities, and dairy-free cheese if needed.
- Flavor Twists: Add crispy bacon, sautéed mushrooms, caramelized onions, jalapeños, barbecue sauce, buffalo sauce, ranch seasoning, or pepper jack cheese for exciting new flavors.
- Seasonal Spins: During summer, top the sliders with grilled vegetables. In autumn, add roasted mushrooms and onions. Winter holidays pair beautifully with cranberry sauce and Swiss cheese, while spring is perfect for fresh herbs and baby spinach.
Cooking Science Explained
A few simple cooking techniques make these sliders taste like they came from your favorite restaurant.
First, baking the entire tray covered with foil traps steam inside, helping the cheese melt evenly while keeping the rolls soft and fluffy.
Second, removing the foil during the final few minutes allows the butter topping to caramelize slightly, creating a beautiful golden finish with a subtle crispness.
Finally, allowing the sliders to rest for five minutes after baking helps the melted cheese settle slightly, making them easier to separate without losing all the filling.
These little details only take a few extra minutes but make a noticeable difference in both texture and presentation.
Easy, Step-by-Step Recipe
Ingredients
- 1 package (12 count) Hawaiian sweet rolls
- 1 pound (450 g) lean ground beef
- 1 small onion, finely diced
- 2 cloves garlic, minced
- 8 slices cheddar cheese
- 4 slices mozzarella or provolone cheese
- 2 tablespoons olive oil
- 1 teaspoon garlic powder
- 1 teaspoon onion powder
- 1 teaspoon smoked paprika
- 1 teaspoon Worcestershire sauce
- Salt and freshly ground black pepper to taste
- For the Butter Topping:
- 4 tablespoons melted butter
- 1 tablespoon Dijon mustard
- 1 teaspoon Worcestershire sauce
- 1 teaspoon garlic powder
- 1 teaspoon dried parsley
- 1 teaspoon poppy seeds (optional)
- ½ teaspoon onion powder
Instructions
- Preheat your oven to 350°F (175°C). Lightly grease a 9×13-inch baking dish.
- Heat olive oil in a large skillet over medium heat.
- Add the diced onions and cook for about 3–4 minutes until softened.
- Add minced garlic and cook for another 30 seconds.
- Add the ground beef and cook until browned, breaking it into small crumbles as it cooks.
- Drain excess grease if necessary.
- Season the beef with garlic powder, onion powder, smoked paprika, Worcestershire sauce, salt, and pepper.
- Slice the entire package of Hawaiian rolls horizontally without separating the individual rolls.
- Place the bottom half into the prepared baking dish.
- Spread the cooked beef evenly over the rolls.
- Arrange the cheese slices over the warm beef.
- Place the top half of the rolls over the filling.
- Whisk together all the butter topping ingredients.
- Brush the butter mixture generously over the tops of the rolls.
- Cover loosely with aluminum foil.
- Bake for 15 minutes.
- Remove the foil and bake another 5–8 minutes until golden brown and the cheese has completely melted.
- Allow the sliders to cool for about five minutes before slicing and serving.
Practical & Valuable Tips
- Storage: Store leftover sliders in an airtight container in the refrigerator for up to four days.
- Serving Ideas: Serve with potato chips, French fries, fresh vegetables, pasta salad, coleslaw, pickle spears, or fruit salad.
- Substitutions: Ground turkey, shredded chicken, pulled pork, roast beef, or sliced ham all work wonderfully.
- Extra Cheese: Mixing two different cheeses creates richer flavor and better meltability.
- Don’t Overfill: Keeping the filling evenly distributed helps every slider stay together when served.
- Toast Lovers: Bake uncovered for an additional two minutes if you enjoy a crispier top.
Make-Ahead & Batch-Cooking
One reason I recommend this recipe for parties is how easy it is to prepare ahead of time. You can completely assemble the sliders several hours before your guests arrive. Simply cover the baking dish tightly with plastic wrap or foil and refrigerate until you’re ready to bake.
Before baking, remove the sliders from the refrigerator about 20 minutes early so they begin coming closer to room temperature. Brush on the butter topping just before placing them into the oven for the freshest flavor.
If you’re feeding a large crowd, prepare two or three trays at once. Since the ingredients are inexpensive and the assembly process is so simple, batch cooking saves both time and effort while ensuring everyone gets plenty to eat.
Leftover cooked sliders reheat beautifully in the oven at 325°F (165°C) for about 10 minutes. Avoid microwaving whenever possible because it can make the rolls slightly chewy.
Eco-Friendly Kitchen Hacks
- Use leftover cooked meat from another meal instead of preparing fresh beef.
- Store leftovers in reusable glass containers instead of disposable packaging.
- Chop extra onions and peppers while cooking to save prep time for future meals.
- Save cheese ends for homemade soups or casseroles.
- Bake multiple dishes together whenever possible to make better use of your oven’s heat.
Pairing Suggestions
- Beverages: Lemonade, sparkling water, iced tea, cola, root beer, fruit punch, or light beer all pair wonderfully with these savory sliders.
- Sides & Sauces: Potato wedges, onion rings, macaroni salad, Caesar salad, creamy coleslaw, ranch dressing, garlic aioli, barbecue sauce, spicy ketchup, or honey mustard all make excellent accompaniments.
Frequently Asked Questions
-
Can I make Party Sliders the night before?
Yes. Assemble the sliders completely, cover tightly, and refrigerate overnight. Wait until just before baking to brush on the butter topping. This keeps the rolls from becoming soggy while allowing you to save valuable time on the day of your event.
-
Which cheese melts best for sliders?
Cheddar, provolone, mozzarella, Monterey Jack, Swiss, Havarti, and American cheese all melt beautifully. Combining two cheeses often creates the richest flavor and smoothest texture.
-
Can I freeze these sliders?
Absolutely. Wrap cooled sliders individually or freeze the entire tray before baking. They keep well for up to three months. Thaw overnight before reheating or baking according to the recipe instructions.
-
How do I keep the bottoms from becoming soggy?
Drain the cooked meat thoroughly before assembling the sliders, avoid adding excessive sauce, and bake on the center oven rack. Toasting the bottom half of the rolls for a few minutes before filling also helps maintain a sturdier texture.
Call to Action
If you’re searching for an appetizer that’s easy to prepare, guaranteed to impress your guests, and packed with comforting flavors, these Party Sliders deserve a place in your recipe collection. They’re one of those recipes that looks like you spent hours in the kitchen even though they’re surprisingly simple to make.
I hope you give this recipe a try for your next family gathering, holiday celebration, game day, birthday, or casual weekend dinner. Once you make them, don’t be surprised if friends start requesting them every single time they visit.
If you enjoyed this recipe, be sure to save it for later, share it with fellow food lovers, and leave a comment describing your favorite filling combinations. I always enjoy seeing the creative ways readers personalize classic recipes.
Bonus: Your Kitchen Notes
One of the things I love most about Party Sliders is that they encourage creativity. Every family eventually develops their own signature version, whether that’s adding crispy bacon, using pepper jack cheese, mixing barbecue sauce into the beef, or layering sautéed mushrooms over the meat.
Use this section in your WordPress editor to keep track of your favorite adjustments. Write down which cheeses your family preferred, which toppings disappeared first, or how many trays you needed for different-sized gatherings. These notes become incredibly valuable the next time you host friends or relatives.
Remember, the best recipes aren’t just instructions—they become traditions. I hope these Party Sliders become one of those recipes your family requests again and again, creating delicious memories around the table for years to come.